Using Liquibase with Spring Boot
The purpose of this tutorial is to guide you through the process of using Liquibase as part of your Spring Boot workflow.
The Liquibase Spring Boot integration ensures the application's database is updated along with the application code by embedding your changelog files in your application and automatically running Liquibase update as part of your application startup.
Prerequisites
Ensure you have Java Development Kit (JDK 17+)
If you do not already have a Spring Boot application, you can create one with the Spring Initializer:
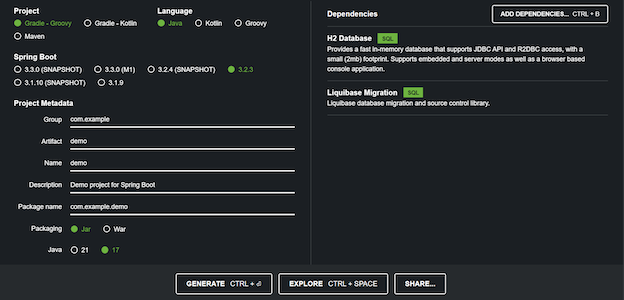
- Under Project, select Gradle Project or Maven Project depending on your preference.
- Select Java as your Language.
- Under Spring Boot, select the version you would like to use.
- For Packaging, select Jar.
- Use version 17 or later for Java.
-
Under Dependencies, select Liquibase Migration, Spring Data JPA, and whatever database you plan to use, such as H2.
After selecting your options, the project window needs to look similar to the screenshot:
-
Click GENERATE to download your project template as a
zipfile. Extract it and open in your IDE.
Add Liquibase
If you did not already add the Liquibase dependency when creating your project, you can add it manually by adding
org.liquibase:liquibase-core as a dependency to your project.
  <dependencies>
     <dependency>
         <groupId>org.liquibase</groupId>
         <artifactId>liquibase-core</artifactId>
         <!-- Springboot already provides a tested Liquibase version, but you can override it to use your preffered version -->
         <version>4.31.1</version>
     </dependency>
  </dependencies>
  dependencies {
        implementation 'org.liquibase:liquibase-core'
  }
Add a Changelog File
Create a changelog file in your project. By default, The Spring Boot Liquibase integration looks for a file named db.changelog-master.xml in the src/main/resources/db/changelog directory.
<?xml version="1.0" encoding="UTF-8"?>
<databaseChangeLog
        xmlns="http://www.liquibase.org/xml/ns/dbchangelog"
        xmlns:xsi="http://www.w3.org/2001/XMLSchema-instance"
        xsi:schemaLocation="http://www.liquibase.org/xml/ns/dbchangelog http://www.liquibase.org/xml/ns/dbchangelog/dbchangelog-latest.xsd">

   <changeSet id="1" author="my_name">
      <createTable tableName="test_table">
         <column name="test_id" type="int">
            <constraints primaryKey="true"/>
         </column>
         <column name="test_column" type="INT"/>
      </createTable>
   </changeSet>

</databaseChangeLog>
Start your Application
When you start your application with mvn spring-boot:run or gradle bootRun, Liquibase will automatically run the changelog file and update your database.
Try it now, and you should see the table test_table created in your database.
Next Steps
- Looking to learn what you can do in your changelog file? Learn more in the Liquibase documentation.
- Customize Liquibase within Spring Boot.
- Use Liquibase Advanced and Pro features with Spring Boot customizers .